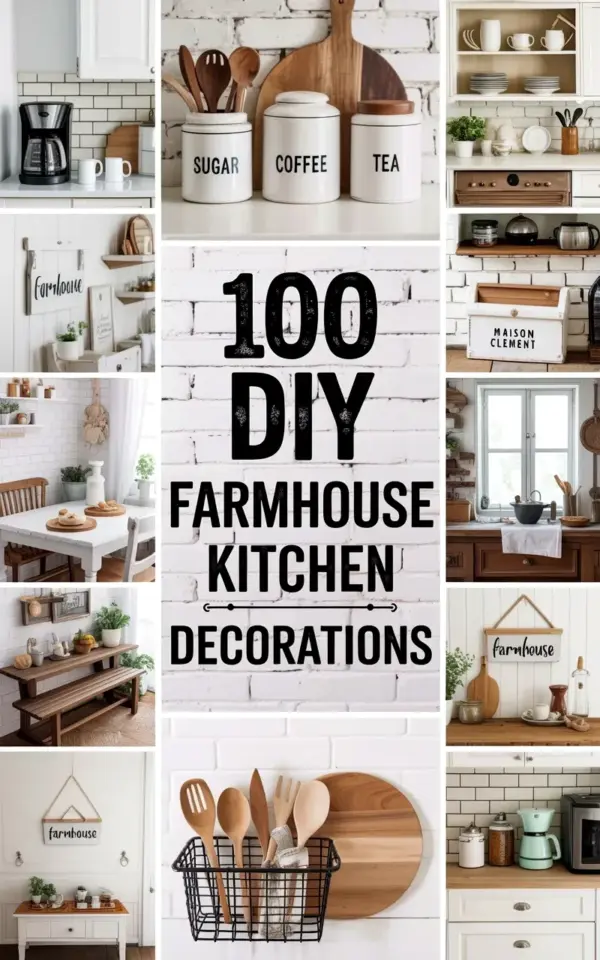
Ok so I’m staring at this Pinterest collage right now and honestly it’s making me want to grab a paintbrush and never stop. The center image shows a white brick wall with black distressed lettering that reads “100 DIY FARMHOUSE KITCHEN DECORATIONS” and around it are 12 little snapshots of exactly the kinds of projects you can actually finish in one weekend. That whole collection of farmhouse kitchen decorations covers everything from labeled canisters to a neat little coffee station and open shelves with wooden utensils. No special skills required. Just thrift store finds and a willingness to get a little paint on your jeans.
Labeled Canisters That Actually Make You Want to Cook
Look at that photo of the white ceramic canisters in the collage. “SUGAR,” “COFFEE,” “TEA” written in that vintage script. Not gonna lie, I spent way too long deciding if my flour should get a label too. Here’s the thing: you can make these yourself for under ten bucks. Hit up a Goodwill and grab mismatched jars with lids. Paint them white or just leave them glass. Then get some matte adhesive labels and write with a sharpie. Or use a label maker if you’re fancy.
One weird thing I discovered: the sugar canister always gets sticky after a month. So I line the lid with a little plastic wrap before screwing it on. Makes cleaning way easier. Anyway, labeling your basics like flour, sugar, and coffee turns a cluttered counter into something that looks staged for a magazine. You don’t need matching sets. Mix shapes, keep the color scheme consistent, and boom.
Setting Up a Coffee Station Without Overthinking It
The collage shows a white coffee station with a coffee maker and a bunch of mugs. Simple right? But I’ve ruined three coffee stations by overcomplicating them. You do not need a dedicated cabinet with a marble backsplash and a sink. Honestly, a corner of your counter works fine. Grab a thrifted wooden tray (I found one with a weird wine stain that sanded off easily) and place your coffee maker, a jar of pods or grounds, and a couple of your favorite mugs on it.
Here’s the trick: keep everything within arm’s reach. If you have to move three things to pour your morning cup, you’ll stop using the station by Tuesday. I put a small pottery pitcher for stirring spoons right next to the machine. Total cost? Maybe fifteen dollars. And the collage proves it: that white setup with the brick wall behind it looks expensive. It’s not. It’s just deliberate.
Styling Open Shelves Without It Looking Like a Store
Open shelving in a farmhouse kitchen is the internet’s favorite thing to argue about. Dust. Clutter. The pressure to have matching dishes. But the collage shows white dishes and wooden utensils on a shelf, and it works because it’s not perfect. There’s a plate that’s slightly off-center. That’s the secret: asymmetry. Stack three white dinner plates on one side. Lean a wooden cutting board behind them. Prop a small vase with dried eucalyptus next to it (or fake, I won’t judge).
What nobody tells you is that the wooden utensils need to be used. Not decoration. I keep a wooden spoon and a spatula on the shelf and I actually cook with them. Stained spoons look more farmhouse than shiny new ones anyway. So does that thrifted bread box I’ll talk about next.
The Bread Box I Didn’t Know I Needed
That white bread box in the bottom row of the collage. I bought one exactly like it from a garage sale for three dollars. The woman selling it said her husband used to store fishing lures in it. Which is weird because it still smelled like bread, not fish. Anyway, I cleaned it, gave it a light coat of chalk paint (just white, no distressing), and now it holds my bagels and sandwich bread. But here’s the random detail: I also keep a little bag of bread clips inside it because I lose them constantly. Organization hack, right?
A bread box keeps your counters looking less cluttered than a bread bag sitting out. And it’s a classic farmhouse piece. If you can’t find one at a thrift store, buy a plain wooden box at a craft store. Add a handle. Done.
Thrifting for Farmhouse Pieces on a Saturday Morning
- Go early. Like, before 9am early. The good stuff vanishes and I’m not above fighting an old lady for a ceramic pitcher.
- Ignore anything with obvious damage unless you’re into the chippy look. Cracks in ceramic can trap bacteria. Just say no.
- Look for white or cream pieces that can be unified with paint later. Sometimes a garish yellow vase is a quick spray-paint job away from being perfect.
- Don’t buy something just because it’s cheap and farmhouse-y. Ask yourself: does this fill a specific gap on my shelf or counter or is it just going to sit in a box? I have three boxes of regret. Learn from me.
- Check the home goods section for baskets, wooden crates, and old enamelware. That’s where the gold is hiding.
Thrifting for farmhouse kitchen decor is a whole mood. It’s not about spending a lot. It’s about finding one piece that makes you smile every time you walk past.
White Paint Fixes Everything (Seriously)
The collage has that white brick wall in the center image. You can rent an apartment with a white wall or you can paint your own. But white paint isn’t just for walls. I painted a hideous orange wooden cutting board white once (and sealed it with food-safe varnish) and it became my favorite bread board. White paint unifies. It makes mismatched thrift finds look intentional. It’s also forgiving: touch-ups are easy and dust doesn’t show as much as on dark surfaces.
Ok so one tip: do not use flat white paint on anything that touches food. Use a semi-gloss or a chalk paint that you seal with wax. Otherwise every water drop leaves a stain and you’ll be frustrated by Tuesday.
Putting It All Together Without Losing Your Mind
You have a weekend. You have the collage in your head. Pick two or three projects from that grid: maybe the canisters, the coffee station, and one shelf. Don’t try to do all twelve. That’s how you end up with half-painted jars and a coffee station in boxes for three months. I know from experience.
Start with the white brick wall effect by painting a small section of wall or a piece of plywood you lean against the backsplash. Add your labeled canisters. Set up the coffee tray. Arrange your open shelf like the one in the image with dishes and wooden utensils. Step back. Honestly it’s that easy. And the best part? You can change it next season when you get bored with the sugar canister and want to switch to oatmeal. Farmhouse decor is flexible. It’s lived-in. It’s yours.
Ready to grab some white paint and thrifted finds? Save this post as your weekend checklist. And maybe send me a photo of your coffee station because I love seeing what people come up with.
#farmhousekitchen #diykitchendecor #farmhousedecor #kitchenorganization #diyfarmhouse
Leave a Comment